Content
How to Integrate a Payment Gateway in Your eCommerce Website

Nowadays, more and more people prefer not to waste time on physical shopping trips, and opt, instead, to buy things or services online right from the comfort of their own home. This is an understandable commodity and benefit of modern life.
Lets talk about itHave a project in mind?
Online shopping means that anything can be purchased online, and not just seen or appreciated. It also means that every merchant aiming to increase sales should consider online payment gateway integration.

What is a payment gateway?
It is a service provider that provides payment authorization. Basically, it’s a software application connecting a website with the bank, so that the customers can pay you right there on the spot without leaving their apartment.
This type of service can be used by anybody, including eCommerce websites, other service providers that want their users to pay online, and even non-profit organizations that collect donations online.
There are many different payment gateways, including Stripe, PayPal, Authorize.net, Google Checkout and direct MasterCard/Visa payments. All of them have their advantages and disadvantages, and each one takes particular commissions.
These days, online payments have become more and more popular. Even older people use digital banking now and pay for many services online. According to Statista, transaction values are also growing rapidly.
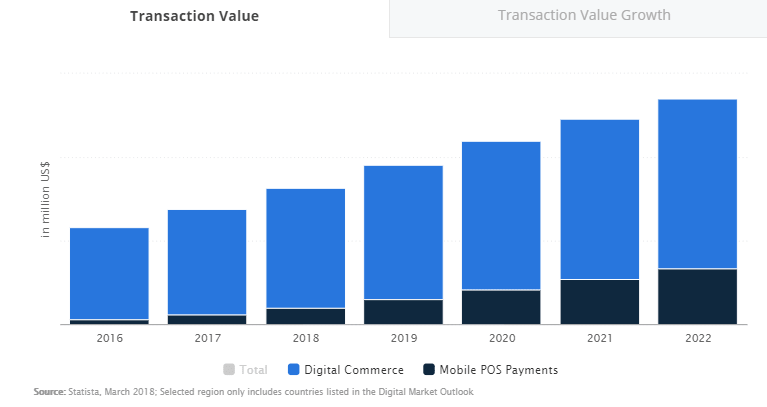
By 2022, transaction values for digital commerce are set to reach US$5,411,354. This only proves the fact that your website needs to provide customers with online payment opportunities.
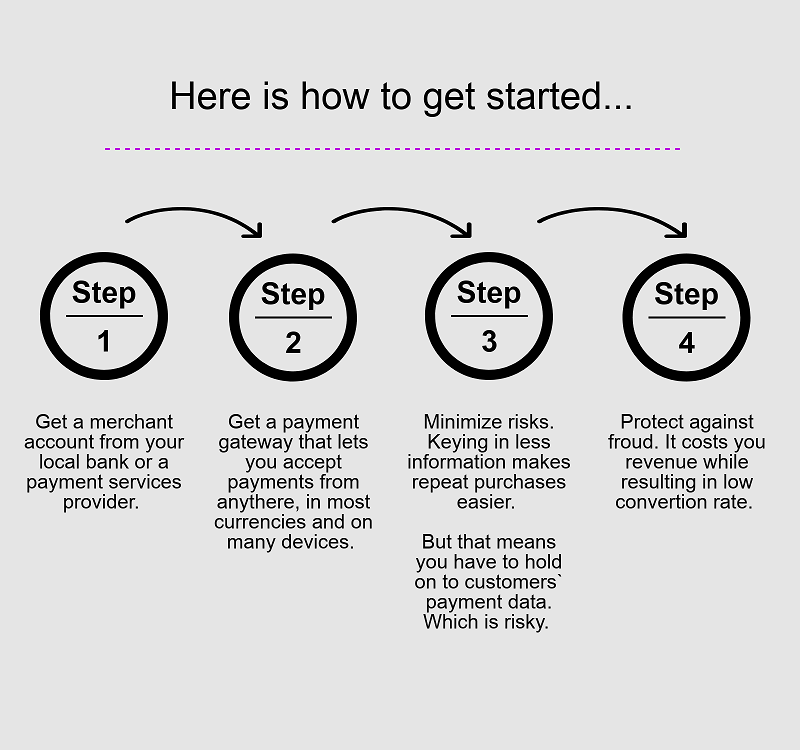
Let’s look at several questions that need to be considered before a payment gateway integration. Understanding how it all works can help you choose the best option and choose the best system for your business. This is an important step, as the convenience of the solution you choose may influence the buying decisions of your potential customers.

How the eCommerce payment gateway works and why you need it
Generally, online payment systems can be compared with the point of service that can be successfully used for any sort of payment with the help of your bank card. Its main role, in this case, is to authorize and approve the transaction, the only difference being that you don’t have to actually use a physical point of service.
Also read: How Ecommerce Business Can Increase Customer Lifetime Value?
If you have an eCommerce website but still wonder whether you need to implement a payment gateway, the answer for you here is, undoubtedly, yes. You will need to implement this so that you have the opportunity to obtain payments directly from your customers. Even if you also have a brick and mortar shop, it still makes sense to add a payment gateway to your website in order to drive more customers and increase sales by serving those people who would never be able to make it to your physical location.
Also read: 10 Best Practices for Creating a Successful eCommerce Homepage
All payments that are processed online are done so as transactions with no card present, which means that you don’t get to see the client’s card, only the information your customer enters in the suggested fields. Without the physical presence of the card, it becomes a bit simpler to commit fraudulent actions on both ends. This means that the online payment system you use should be reliable and provide a high level of security.
Also read: What is the Best Multi Channel Ecommerce Platform?
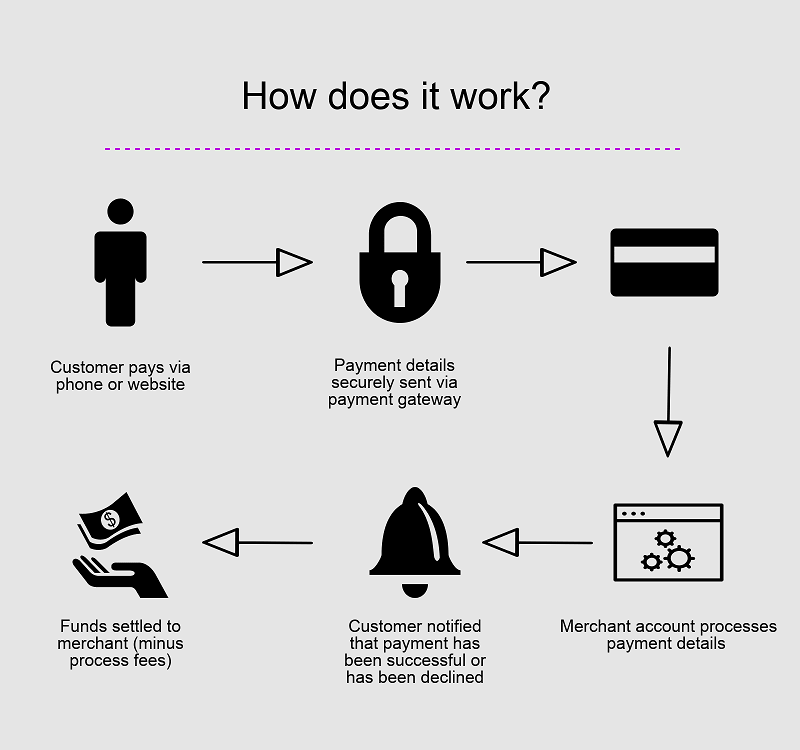
All payment systems use approximately the same mechanisms, consisting of several stages, most of which are hidden behind the stage. There is a bunch of “communication” between different facilities, series of approvals, complex processes of sending funds, etc. The whole process, in brief, looks like this:
- Order confirmation and provide credit card information.
- Information encryption for security reasons.
- Information being sent to credit card associations: Visa, MasterCard, etc.
- Transaction approval or denial.
- In case of approval, transaction changes status to authorized.
- Approval on the merchant’s side.
- Payment gets to the card issuing company.
- Payment is sent to the relevant bank.
- The bank confirms the transaction and adds it to the cardholder’s statement.
Some of these steps happen almost simultaneously, though the funds may take a while to actually appear on your account. Modern gateways comply with all the mentioned operations and authorizations in order to protect both parties and let then finalize their deals.
Now you see that the question is not about whether you need payment system, but it is how to include a payment gateway in a website and how to make sure you chose the right one.
How to choose the right gateway for your eCommerce website
First of all, the choice lies between integrated and hosted payment gateways. Integrated options allow users to establish a connection with them through the API they provide for your eCommerce website. Speaking in plain terms, you serve the customer right there on your site without sending him or her away. On one hand, it’s great, as it cannot possibly harm your conversion rates.
On the other hand, it makes you responsible for the security and keeping your customer’s data well-protected. Most likely, you will need some development performed by a professional programmer to handle most integrated gateways, as it is quite an undertaking to do on your own.
Hosted payment gateways take the transaction itself away from your website so that it happens on a payment platform’s processor. In this case, you can breathe easily without being responsible for any private data or PCI compliance. PayPal operates in this way, for example. There are some drawbacks in this type of gateway, too, as some customers don’t trust third parties, and the fact that you likely don’t want your customers to have to leave your website to complete a payment, as this lowers the conversion rate.
To make the right choice, you should analyze the eCommerce platform you use. If you use Shopify, there are some special requirements to make sure that the chosen gateway is compatible.
The cost of payment gateway integration
Before you integrate online payment into your website, check the fees that apply in different stages. They often add up, and it’s better to have a list of what is important for you in order to pay attention specifically to the development of those elements.
To start, there are always registration, setup and monthly fees. Then, there are transaction, processing, refund and chargeback payment fees. Don’t forget about these hidden components, or you will be surprised down the road. In addition, there are fund transfer fees and termination fees. These are different according to the different payment gateways, though the difference is often not too prominent.
Accepting online payments is not the only advantage of gateways, as these are very complex and often multifunctional systems. Depending on what you need, you might add features that will make it more safe or convenient for your users to transfer their money. Payment gateways often help with other operations, such as:
- PCI Compliance to avoid fines.
- Recurring bills on a subscription-based pricing scheme.
- Notifications to verify transactions.
- Payment information storage so that your customers don’t have to re-enter their personal information.
- Virtual terminal imitation physical credit card terminal for convenient input.
- Developer information and API tools for customization, in order to fit specific needs.
- Encryption for high levels of security for sensitive user information.
- Integration with other tools like accounting software or shopping carts.
Below are some examples of payment gateways that are popular now; however, the number of such systems is growing fast with new technologies appearing on the market. While those are being tested, you may want to choose one of the better-known options.
PayPal
There is hardly a person today who hasn’t heard of PayPal, especially if they are an active user. It is one of the most famous payment systems in the world and, according to Statista, the payment volume in PayPal doubled from 2014 to 2017, and it seems like there is still potential for growth, as the company keeps adding new features to lure customers.
Another advantage of PayPal is that there are many freelancers paid through this system, which accumulates significant sums of money in their accounts. Spending this money within the PayPal ecosystem is easy and convenient, which is an additional benefit. Providing your potential customers with the possibility of using a system they already know well can bring amazing results.
To pay through PayPal, users don’t even have to provide their bank account information. Instead, they just need to create an account within PayPal itself. This platform is especially popular among millennials, so most mid-sized businesses use this type of payment gateway to get paid and increase revenue levels among clients who have these types of accounts. As for large companies, they usually integrate this system as an additional payment gateway.
In this case, the question of how to integrate a payment gateway into a website has a very clear and simple answer. It is being integrated through the Express API, which is a fast and convenient method.
Here are some examples of the Standard PayPal and Express Checkout processing fees:
- No setup or monthly fees
- US fees – 2.9% + $0.30 per transaction.
- International fees – 3.9% + $0.30 per transaction.
PayPal Payments Pro processing fees:
- No setup fees.
- $30 monthly fee.
- US fees – 2.9% + $0.30 per transaction.
- International fees – 3.9% + $0.30 per transaction.
- Virtual terminal fees – 3.1% + $0.30 per domestic transaction; additional 1% for cross-border transactions.
How to integrate PayPal
You’ll need the JavaScript checkout.js script to integrate Express Checkout, and this is provided by PayPal. To render the button on your website, simply add the checkout.js script to your client and also add this code on the page where you want the PayPal button to render:

With the help of the PayPal checkout script, you can configure the appearance of the button on your website and define the scenario after buyer authorizes or cancels the payment, as well as determine what happens in case of an error.
- #paypal-button - Container element in which the button is rendered.
- Style - Button appearance customization.
- payment() - Function called at a time when your customer clicks the button. Here you can set up and return a payment to start the checkout process.
- onAuthorize() - Function called when your customer logs in and authorizes the payment. Here you may show a confirmation page and take the payment.
- onCancel() - Function called in case of payment cancellation. By default, the customer is taken back to the original page; however, you can change this setting and take them to any other page.
- onError() - Function called in case of an error. Here you may let your customer try again or simply show an error notification.
- #paypal-button - Container element in which the button is rendered.
As for the integration itself, there are several options such as:
- Client-side Rest;
- Braintree SDK; and,
- Server-side REST.
You can choose the method that suits the needs of your business in the best way. Don’t forget to test everything before you let your clients actually use your payment form live.
Authorize.net
This payment gateway is one of the oldest available. It started operating in 1996, so it has quite a well-established reputation. This payment processor is sometimes called the king of online payments, with its great fraud protection services, easy-to-use checkout opportunities and customizable integrations and subscription-based additional features.
The interface is friendly, which means that users are likely to finalize deals instead of dropping them half-way due to bad UI/UX design (which might happen with less reputable payment processors). If you have in-house or freelance developers who deal with this area of your business, they might be happiest with this solution. It is also quite easy to integrate a payment gateway in website if you choose Authorize.net.
Here is some data on the processing fees:
- $49 setup fee, paid only once.
- $25 getaway fee, monthly.
- $25 chargeback fee.
- Transaction fee – 2.9% + $0.30.
How to integrate Authorize.net
To obtain access to Authorize.Net API you need to create a sandbox account with merchant authentication. All requests are being sent via the HTTP POST method to one of the API endpoint URLs.
- HTTP Request Method: POST
- Sandbox API Endpoint: https://apitest.authorize.net/xml/v1/request.api
- Production API Endpoint: https://api.authorize.net/xml/v1/request.api
- XML Content-Type: text/xml
- JSON Content-Type: application/json
- API Schema (XSD): https://api.authorize.net/xml/v1/schema/AnetApiSchema.xsd
To actually integrate Authorize.net, there are several options, including:
- Server Integration Method (SIM).
- Advanced Integration Method (AIM).
- Direct Post Method (DPM).
- Simple Checkout.
These provide different levels of compliance and control, have different SSL requirements and suit different types of businesses. The best option is to check the official website and choose the best solution from there.
Stripe
As opposed to the previous payment gateway solutions we’ve discussed, this one is quite cutting-edge. It appeared on the market not too long ago, and has already gained a great reputation among payment solution providers. It is highly customizable and suggests some state-of-the-art and complex features such as accepting payments through subscriptions, marketplace or third-party applications.
As mentioned above, Stripe is amazingly easy to customize, which means that your developers will be able to adjust everything to the particular needs of your company. If there are no special needs, there are still options of making it even more appealing for your customers to shop on your eCommerce website.
Example of processing fees:
- No setup fees; no monthly fees.
- $15 chargeback or dispute fee.
- Transaction fee – 2.9% + $0.30 / transaction.
- ACH and Bitcoin processing fee – 0.8% · $5 cap.
How to integrate Stripe
To provide your customers with the opportunity to use the Stripe gateway, you need to create a payment form on your website. It is simple with the help of pre-built UI components called Elements. Here is the process:
Step 1: Set up Stripe Elements
You can find all the elements in Stripe.js. Load this script directly from https://js.stripe.com and include it on your page:
For better fraud protection, it is recommended to include the script not only on your checkout page, but also all the other pages. Thus, Stripe will be able to detect anomalous behavior and protect your website from potential fraud.
Then, make an instance of Elements that looks like this:
var stripe = Stripe('pk_test_6pRNASCoBOKtIshFeQd4XMUh');

var elements = stripe.elements();
Replace the random API key above with the actual publishable API key, so you’ll be able to test this code through your account on Stripe. Don’t forget to replace it with the live key for production use when you are actually ready to accept customers’ payments.
Step 2: Create a payment form
Elements will create UI components that will be hosted by Stripe; they will collect all the card data from your clients and keep it secure. You won’t have to create them manually, as they will be placed into your form from there.
To insert these components in the appropriate areas, create empty DOM containers with unique IDs inside your payment form. The best way to do this is to place the container within a

After this form is loaded, create an instance of an Element and put it in the Element container:
// Custom styling can be passed to options when creating an Element.

var style = {

 base: {

   // Add your base input styles here. For example:

   fontSize: '16px',

   color: "#32325d",

 }

};


// Create an instance of the card Element.

var card = elements.create('card', {style: style});


// Add an instance of the card Element into the `card-element`
card.mount('#card-element');
The card Element minimizes the number of fields and makes the form simpler so that there is a single, flexible input field collecting all the necessary data.
Step 3: Create a token to securely transmit card information
All the payment data collected through Elements may be turned into a token. Handle the submit event on the form by creating an event handler. It sends the data to Stripe and prevents the submission.
// Create a token or display an error when the form is submitted.

var form = document.getElementById('payment-form');

form.addEventListener('submit', function(event) {

 event.preventDefault();


 stripe.createToken(card).then(function(result) {

   if (result.error) {

     // Inform the customer that there was an error.

     var errorElement = document.getElementById('card-errors');

     errorElement.textContent = result.error.message;

   } else {

     // Send the token to your server.

     stripeTokenHandler(result.token);

   }

 });

});
In this case, stripe.createToken returns a Promise which resolves with a result object. This object has either:
- result.error: a Token was created successfully.
- result.error: an error occurred. This can include client-side validation errors. Check the API reference for possible errors.
Step 4: Submit the token and the rest of your form to your server
Now submit the token to your server with all the additional information collected. This is how it should look in JavaScript:
function stripeTokenHandler(token) {

 // Insert the token ID into the form so it gets submitted to the server

 var form = document.getElementById('payment-form');

 var hiddenInput = document.createElement('input');

 hiddenInput.setAttribute('type', 'hidden');

 hiddenInput.setAttribute('name', 'stripeToken');

 hiddenInput.setAttribute('value', token.id);

 form.appendChild(hiddenInput);


 // Submit the form

 form.submit();

}
Custom gateway
Sometimes it feels like no given option fits the needs of your business. With the number of options provided on the market, it is sometimes hard to imagine, but it happens more often than you might think. Building a custom Fintech solutions is a complicated but rewarding endeavor. Rewarding for the developers, first of all, as a full-stack custom payment gateway software’s cost might start at $150,000. Of course, the price can even be higher if you aim at solutions that will stand next to those available on the market now.
Of course, there are some significant benefits with such an expensive venture. Having developed a new payment application, you’ll be able to control the technology used there and enhance it in any way that suits your business’ operational model. Consider, also, the fact that you can avoid processing fees. If your turnover is really large, this benefit speaks for itself.
Summary
Whatever solution you choose, now you know the basic answers to the question of how to add a payment gateway to a website. Always start with thinking about the best fit for your particular situation.
How many transactions per month do you have and how many do you plan on having in the future? Planning is as important as ever, in this situation. Consider different options and check to see if they go along with your business objectives.
Remember that websites with payment gateways are always more convenient for customers unless you run a non-profit blog or something of that sort. If you need more advice on payment gateway integration, contact us at Dinarys.
We are always glad to discuss what we know well, and provide options for solutions that we can definitely help with.
Lassen Sie Profis Ihre Herausforderung meistern
Unsere zertifizierten Spezialisten finden die optimale Lösung für Ihr Unternehmen.

